
I’ve made this Yule log for Christmas day dessert a few times before, but I always ran out of time/energy when it came to adding the finishing touches. This weekend the same thing nearly happened again, but then I thought: What kind of food blogger doesn’t have time to make meringue mushrooms and chocolate bark for her Bûche de Noël?
Now that I’ve made this log with all the trimmings, I don’t know why I didn’t do it before: It doesn’t take that much longer, it’s really very easy and it looks like something you would see in a fine French patisserie. It can also be made in stages, so you don’t have to set a whole day aside, and will keep in the fridge overnight. All you have to do on Christmas day is assemble the meringue mushrooms.
Things I have learnt from making this Bûche de Noël:
Rolling the warm sponge cake in a tea towel, does actually make it crack less. Although mine still cracked a little in the middle, it makes for a much more even log in the end, so well worth the extra bit of washing.
Don’t try to substitute unsweetened chestnut purée for the sweetened version. No amount of icing sugar and vanilla extract will make it taste the same (believe me, I’ve tried).

For the chocolate cake:
(Adapted from Smitten Kitchen’s Heavenly chocolate cake roll recipe)
170g dark chocolate
6 eggs, separated and at room temperature
3 tablespoons water
150g caster sugar
¼ teaspoon salt
2 tablespoons icing sugar
- Preheat the oven to 170°C. Line a 30x35 cm baking tray with buttered parchment (the recipe says to use a 10x15 inch tray but I don’t have one that size, so I used an adjustable tray at roughly equivalent measurements).
- Melt the chocolate with the water in the microwave in short bursts and stir until the last few lumps are melted. Allow to cool slightly.
- Whisk the egg whites in a large mixing bowl with electric beaters until stiff peaks form.
- In a separate bowl, but using the same beaters (no need to wash them up if you have done the egg whites first) beat the egg yolks until pale and the gradually add the sugar whilst still whisking. Beat the mixture until very pale.
- Add the chocolate mixture to the egg yolks and beat until just combined.
- Fold a quarter of the egg whites into the chocolate/egg yolk mixture. Once fully combined, fold in the remaining egg whites in three additions.
- Pour the cake batter into the prepared tray and gently level it out.
- Bake in the oven for 15 minutes or until a knife inserted into the middle comes out clean.
- Remove from the oven and cover in damp paper towels. Leave for 10 minutes.
- Remove the paper towels and sift 1 tablespoon of the icing sugar over the top of the cake.
- Place a clean tea towel over the top and turn out onto a work surface with the tea towel underneath.
- Carefully remove the parchment. Sift over the remaining tablespoon of icing sugar.
- Fold the edge of the tea towel over one long side. Begin rolling from this edge, with the tea towel inside, until the cake is fully rolled. Leave on a wire rack to cool.
For the chocolate bark:
200g milk chocolate, broken into squares
- Melt the chocolate in the microwave until completely smooth.
- Spread the chocolate very thinly over a large sheet of baking parchment with the back of a spoon.
- It doesn’t need to be completely even, in fact a bit of unevenness adds to the character, but it should be spread very thinly.
- Leave to set and then break into shards of varying sizes.
200g sweetened chestnut purée
200ml double cream
- Whip the cream until stiff
- Stir in the chestnut purée
130g dark chocolate, finely chopped
150ml double cream
120g butter, softened
230g icing sugar
- In a large bowl, heat the chopped chocolate and cream in the microwave in short bursts. Keep stirring between heating and stop when it becomes smooth and fully combined. If it splits, just add a very small amount of milk or cream and stir vigorously.
- Add the softened butter and beat with electric beaters to combine. Gradually sift in the icing sugar and beat to a smooth, thick consistency.
For the meringue mushrooms:
(adapted from Sprinkle Bakes Bûche de Noël recipe)
1 egg white, at room temperature
1/8 teaspoon cream of tartar
55g caster sugar
50g white chocolate, melted
1 tablespoon cocoa
- Preheat oven to 140°C and line a large baking tray with parchment.
- Whisk the egg whites on the low speed until frothy.
- Add the cream of tartar and continue to whisk on a high speed to soft peak stage.
- Gradually add in the sugar whilst continuing to beat the mixture.
- Once the mixture is very shiny and forms stiff peaks, it can be transferred to a piping bag.
- Snip the end of the bag off and pipe onto the baking tray making mushroom caps and stalks of various sizes.
- Make sure some of the stalks fall over onto their sides. These ones can be used for the mushrooms attached to the sides of the log (see picture below).
- Use a dampened finger to smooth over any peaks in the mushroom caps.
- Bake meringues in the oven for 1 hour.
- Switch the oven off and prop the door open with a wooden spoon. Leave the tray in the oven for another hour for the meringues to dry out. If doing this the night before you can just leave them in the oven with the door closed overnight.
- Once completely cool, make a small hole in the underside of the mushroom caps with a sharp knife. Fill each hole with the melted white chocolate and poke the stalk into the hole. Leave to set and repeat until all the mushrooms are assembled.
- Dust the tops of the mushrooms with a small amount of cocoa powder.

Assembling the Yule Log:
- Carefully unroll the cake and spread the top with an even layer of the chestnut cream, making sure to get it as close as possible to the edges. If the cake cracks whilst doing this, don’t panic! It will be held in place by the cream once you have rolled it, and won’t notice at all when covered in buttercream.
- Roll up the cake gently but firmly using the tea towel to help.
- Place the roll seam side down and cut off one end (about a quarter of the way along) at a 45° angle. Place the two parts of the log on a cake board or plate with the cut side of the short piece against the long side of the larger piece (see pictures, that will probably make more sense!).
- Spread the buttercream over the cake, keeping 3 tablespoons aside for attaching the mushrooms.
- Make swirl patterns in the buttercream on the three ends of the logs with a fork.
- Once the cake is completely covered by the buttercream you can start on the bark. Begin at the top and work down the sides of the log, making sure the edge of the bark is firmly stuck into the buttercream.
- Put the log in the fridge until you have made the mushrooms. This could also be left in the fridge overnight and the mushrooms made the next day.
- Before adding the mushrooms, sift over a generous amount of icing sugar, to make the snow.
- NB: You can make the meringue mushrooms in advance then store in an airtight container before assembling them. Meringues can dissolve when they come into contact with buttercream, so I would leave this part until a few hours before serving.
- Attach the mushrooms to the sides of the log and around the cake board with a small blob of buttercream.
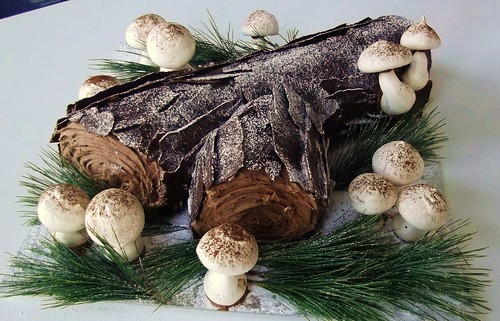
- Artfully place some spruce twigs around and about the cake board, and finish with a final sifting of icing sugar
Wow this is a VERY long post! I promise this cake is nowhere near as complicated as all this writing makes it look!
No comments :
Post a Comment